DragonWarden
  • Adventures
  • The Oven
  • The Un-Tea Party
  • Secret Ingredients
  • About

(Almost) Poultry Palace Chicken Drumsticks

9/5/2021

0 Comments

 
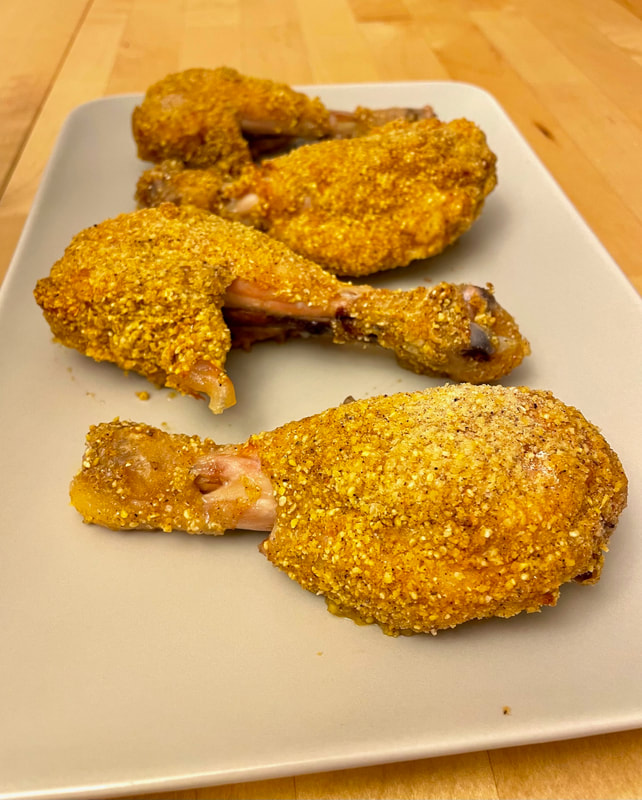
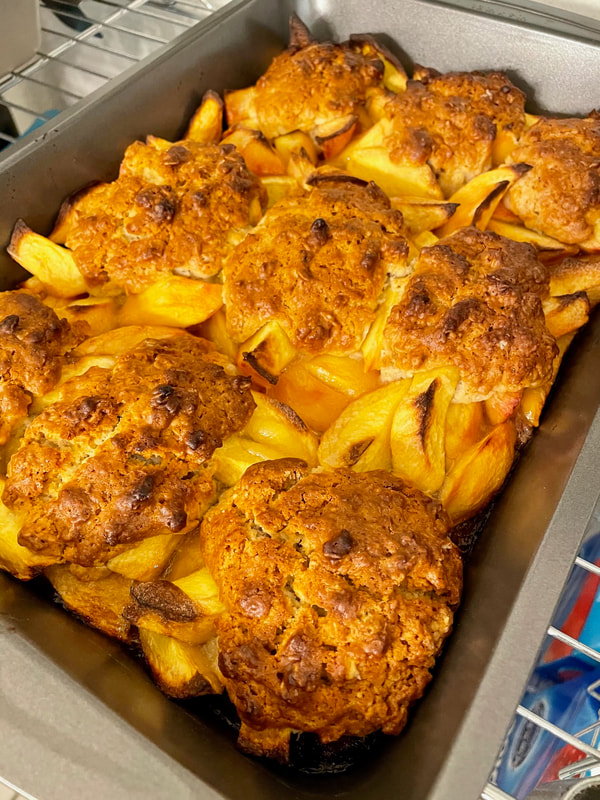
The Poultry Palace at Disney's California Adventures serves up drumsticks that might conjure up disturbing memories of Shake n Bake for some folks, but for me, it was a revelatory experience of what an alternative to the traditional "fried" chicken can be. There was no oily, greasy thick skin of fried batter, and yet there was still the experience of a crusty crunch. The meat was juicy and tender. After that one meal, my boyfriend and I couldn't stop talking about it for months afterward. So finally, I decided to try my hand at recreating it.

After trawling through a dozen recipes, I'm happy to say that an adaptation has recreated, if not the exact taste, the experience we were looking for! Tender, juicy, but with that essential crunchy exterior and savory spiced experience. Thankfully, we can now fulfill our Poultry Palace cravings without having to pay the entry fee for Disney!
Picture
  • 8-10 drumsticks
  • 1/4 cup olive oil
  • 1/4 cup flour
  • 1/2 cup fine-ground cornmeal
  • 1/2 tsp poultry seasoning
  • 1 tsp salt
  • 1 tsp paprika
  • 1 tsp onion powder
  • 1/2 tsp black pepper
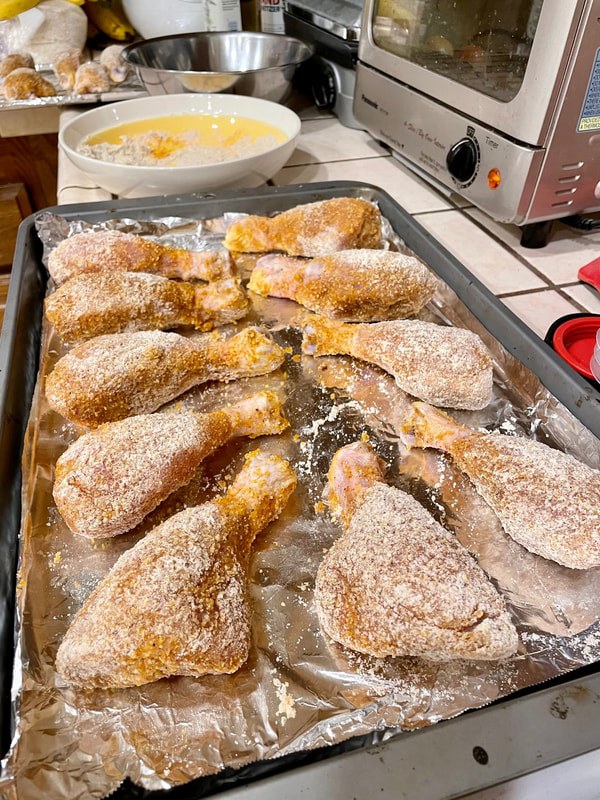
  1. Preheat the oven to 425 F. Prepare a baking sheet (you may line it with foil to help contain the mess).
  2. Pat the drumsticks dry. (Optional) Using a sharp knife or a pair of kitchen sheers, take as much skin off the drumsticks as possible. Because the skin can shrink as the chicken bakes, I prefer to just remove it and ensure all of the drumstick is nicely coated by the batter.
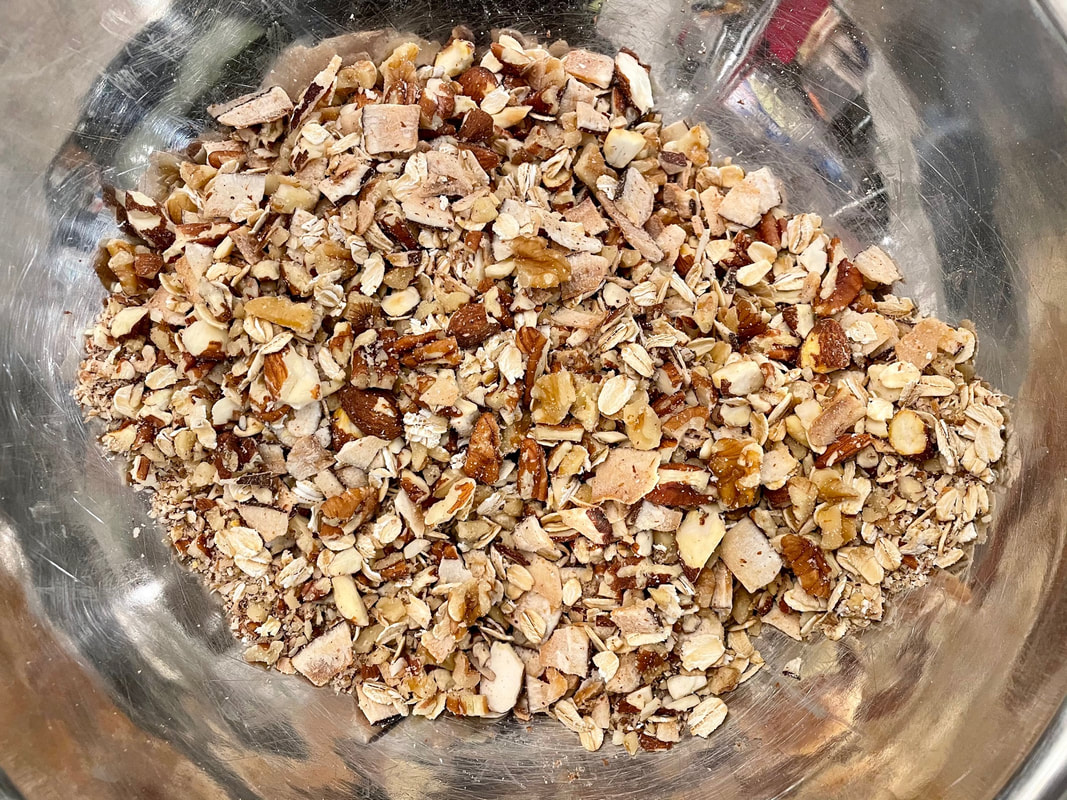
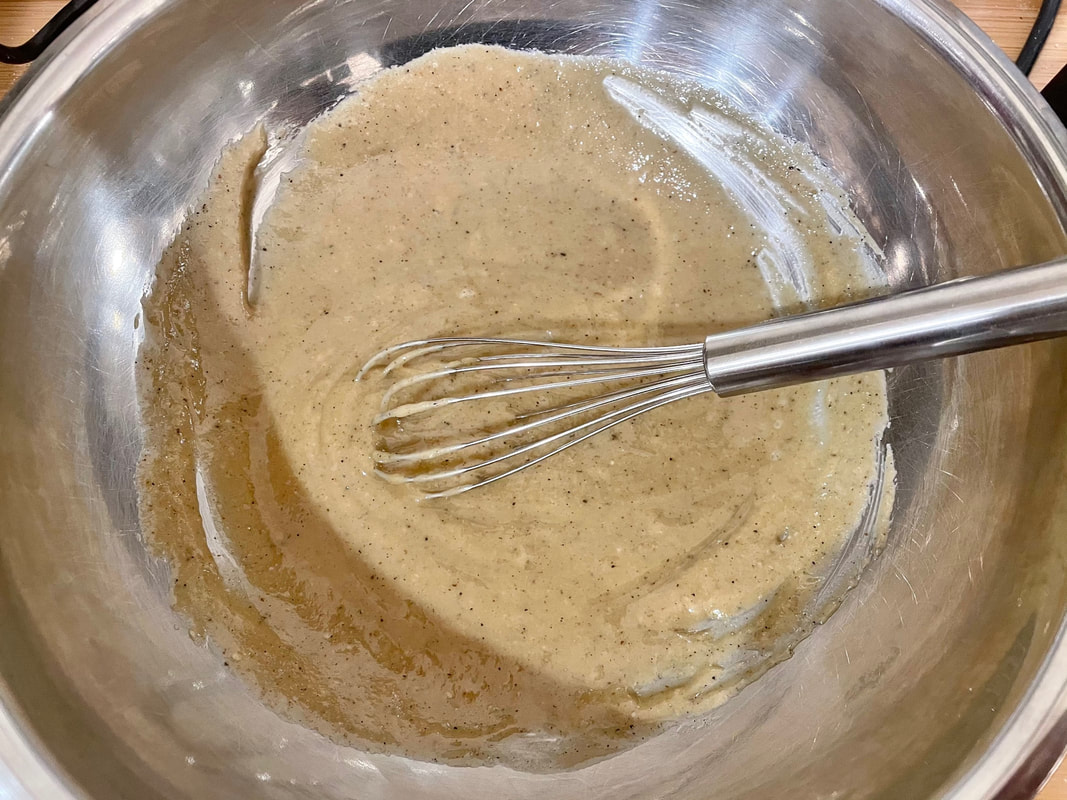
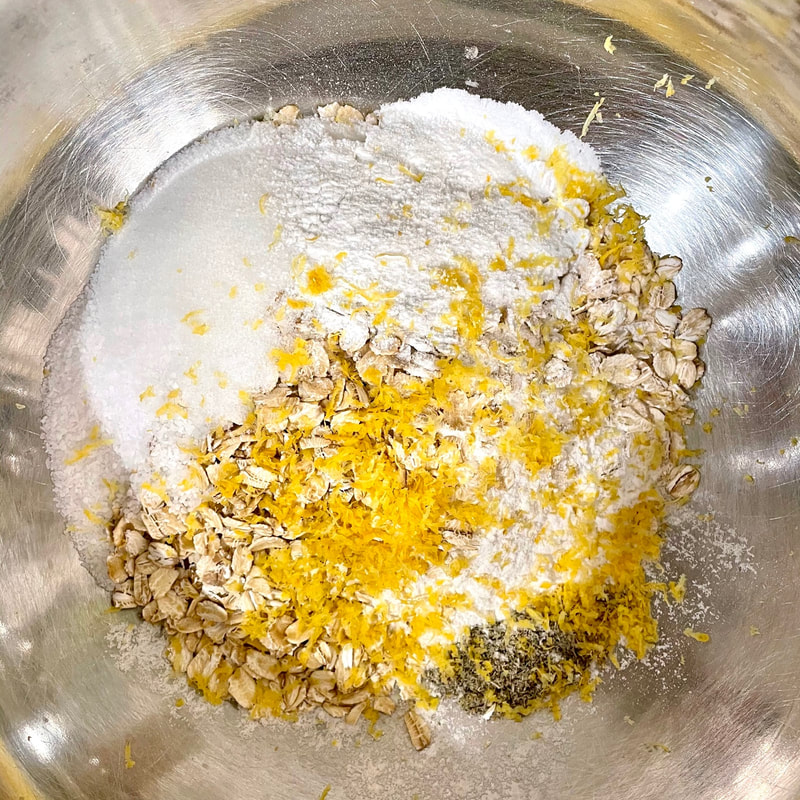
  3. Pour the olive oil into one bowl. In another bowl, mix all of the dry ingredients thoroughly.
  4. Take each drumstick and coat it in the olive oil. Then dredge it thoroughly through the spice mixture. Then lay it on the baking sheet.
  5. Bake for 40-45 minutes.
0 Comments

Ermine Frosting (Roux-based)

3/24/2021

0 Comments

 
In my continuous search for less-sweet frosting options, I stumbled across this roux-based frosting that makes a fantastic base for various flavored versions that lets the flavors shine instead of the sugar!
Picture
  • 5 tbsp flour
  • 1 cup sugar
  • 1 cup milk, warm
  • 1.5 tsp vanilla
  • pinch of salt
  • 1 cup unsalted butter
  • chocolate option: 1/4 cup cocoa powder, unsweetened
Thickening roux:
  1. Place flour and sugar in a large saucepan over medium heat. Cook, stirring constantly, for 30 seconds.
  2. While whisking constantly, slowly pour the milk in (this ensure it's lump free).
  3. As the milk gets hotter, it will start to thicken - stir constantly so the base doesn't catch.
  4. Cook until the mixture thickens in a thick, dolloping custard - see video for texture. TIP: Thicker texture = thicker frosting texture but won't make the frosting dense, it's still fluffy and spreadable but it just makes it "sturdier" with sharper edges when piped.
  5. Remove from heat and scrape into a bowl. Cover with cling wrap, pressing down onto the surface to prevent a skin from forming.
  6. Cool completely (I leave on counter for 20 min or so then refrigerate 30 min to speed up but don't let it get chilled, best at room temp to beat into butter). You can leave in fridge overnight but take it out 1 hour prior to using (to dechill - otherwise it won't mix well with softened butter).
Making frosting:
  1. Place butter in a bowl and use either a handheld beater or stand mixer (with whisk attachment) to beat for 3 minutes until it's smooth and changes from yellow to very pale yellow, almost white.
  2. Now start whipping in the Thickening Roux. On speed 5 (medium), start adding the thick roux one heaped tablespoon at a time. Take about 1 minute to add it all.
  3. Once all added, add vanilla and salt, then whip for 2 to 3 minutes until you can see that it is still enough to hold peaks. Then it's ready to use!
  4. For chocolate option: Beat in the cocoa powder at the end, just until mixed through.
0 Comments

Grain-free Tahini Granola

3/22/2021

0 Comments

 
I love baking with tahini, so I jumped at the excuse to use it in a granola. Obviously, one could adjust the ingredients and ratios as one wishes; my one caveat is that I found the original recipe way too salty, even when using the proper kosher salt. So I've reduced it down to my usual ratio for a single baking recipe. Feel free to adjust it back up to your taste.
Picture
  • 3 cups mixed raw nuts, such as pistachios, pecans, walnuts, and/or almonds
  • 1 cup unsweetened coconut flakes
  • ¼ cup pure maple syrup
  • ¼ cup tahini
  • 2 Tbsp. extra-virgin olive oil
  • ¼ tsp. kosher salt
  • ½ tsp. ground cardamom or cinnamon
  1. Make sure to pre-mix your tahini so that there are no solids settled at the bottom and it is creamy and smooth. If necessary, try heating it up a bit in the microwave to help it re-emulsify.
  2. Preheat oven to 300°. Line a rimmed baking sheet with parchment paper or foil. Toss nuts and coconut in a large bowl. Whisk maple syrup, tahini, oil, salt, and cardamom in a medium bowl until combined. Pour tahini syrup over nut mixture and toss with a spatula until evenly coated. Scrape onto prepared sheet. Bake granola, tossing and rotating sheet from front to back every 10–15 minutes, until golden brown, 30–35 minutes total.
  3. Let cool on baking sheet (granola will crisp as it cools), about 20 minutes. Break into pieces before serving.
  4. Do Ahead: Granola can be made 2 weeks ahead. Store in an airtight container at room temperature.
0 Comments

Avgolemono Soup (Greek Lemon Chicken soup)

3/21/2021

0 Comments

 
I've only been vaguely aware of a staple lemon soup in Greek cuisine but it turns out it's my boyfriend's favorite comfort food. One day his stomach wasn't feeling that great, so I tried my hand at making it using this recipe - and now it's one of my favorites too! I frequently make a big pot of it and then freeze it into blocks for anytime I need a quick something in my stomach. Since I need a high protein/fat-to-carb ratio, I also tend to load up the chicken end of the ingredients list, but really, just like any soup you can feel free to throw in or take out whatever you want in this, just keep the lemon and egg-to-liquid ratio about the same. 
Picture
  • Extra Virgin Olive Oil
  • ½ to 1 cup finely chopped carrots
  • ½ to 1 cup finely chopped celery
  • ½ to 1 cup finely chopped green onions
  • 2 garlic cloves, finely chopped
  • 8 cups low-sodium chicken broth
  • 2 bay leaves
  • 1 cup rice
  • Salt and pepper
  • Either cooked boneless, skinless chicken pieces (a store-bought rotisserie chicken shredded works) or un-cooked, skinless chicken cut into bite-sized pieces - 6-8 oz if having soup as appetizer, can be up to 30 oz if you want to have it as a meal
  • ½ cup freshly-squeezed lemon juice
  • 2 large eggs
  • Fresh parsley for garnish (optional)
  1. In a large Dutch oven or heavy pot, heat 1 tbsp olive oil on medium-high. Add the carrots, celery and green onions, toss together to saute briefly then stir in the garlic. Add the chicken broth and bay leaves to the pot then raise the heat to high.
  2. Rinse the rice thoroughly and leave to soak in water for about 15 minutes.
  3. Once the broth has come to a rolling boil, add the rice, salt and pepper. If you're using raw chicken, put the chicken pieces in as well. Turn the heat to medium-low and simmer for 20 minutes or until the rice is tender. If you're using cooked chicken, stir in the cooked chicken now.
  4. To prepare the egg-lemon sauce, in a medium bowl, whisk together the lemon juice and eggs. While whisking, add 2 ladles-full of the broth from the cooking pot to temper the eggs. Once fully combined, add the sauce to the chicken soup and stir. Remove from the heat immediately.
  5. Garnish with fresh parsley, if you like. 
0 Comments

Peach Lavender Cobbler

2/22/2021

0 Comments

 
This recipe was an unexpected hit as not just a fruit cobbler, but potentially as a standalone scone - two for the price of one! While I couldn't tell it had lavender in it at all by the time everything was cooked (perhaps if I had made the topping alone as a scone or lived dangerously and upped the amount of lavender in it?), everything about it was scrumptious. My one adjustment? Too much salt in the topping portion. So I've toned that part down quite a bit.
Picture
Filling
  • 4_1/2 pounds freestone peaches — peeled, pitted and diced (10 cups)
  • 2_1/2 tbsp instant tapioca or corn starch
  • 1/3 cup sugar
  • 1/2 tsp kosher salt
  • 1/2 tsp fresh lemon juice
Topping
  • 1 tsp dried lavender blossoms
  • 1 cup all-purpose flour
  • 1/2 cup plus 2 tablespoons rolled oats
  • 1/4 cup granulated sugar
  • 1 tbsp baking powder
  • 1/2 tsp kosher salt
  • Finely grated zest of 1 lemon
  • 5 tbsp unsalted butter, diced
  • 1/2 cup heavy cream, plus more for brushing
  • 1/4 cup buttermilk
  • 2 tablespoons turbinado sugar
  1. Preheat the oven to 400°. In a bowl, mix the peaches, tapioca, sugar, salt and lemon juice. Transfer the filling to a 9-by-13-inch baking dish.
  2. Using a spice grinder or a mortar and pestle, grind the lavender to a powder. In a bowl, combine the lavender, flour, oats, granulated sugar, baking powder, salt and lemon zest. Cut in the butter using a pastry blender or two knives, until the mixture resembles coarse meal. Add the 1/2 cup of cream and the buttermilk; stir until the dough is just moistened.
  3. Using two spoons, form 3-tablespoon mounds of the topping and arrange them evenly over the peaches. Brush with cream and sprinkle with the turbinado sugar. Bake the cobbler for 50 minutes, until the topping is golden brown and the fruit is bubbling. Let cool slightly before serving.
0 Comments

Shortbread Crust

2/1/2021

0 Comments

 
This was originally a part of the super-lemony lemon tart, but I broke it out into its own recipe because I ended up using it for several other things, such as the other tart-tasting sweet, the cranberry tart. This ended up such a simple, reliable recipe that it's now my go-to substitution for quite a lot of things!
Picture
  • 8" square pan or 9" round pan
  • ½ cup butter
  • ¼ cup sugar
  • ¼ tsp salt
  • 1 cup flour
  1. Preheat oven to 350F. If the pan does NOT have a removable bottom, line it with foil (it will help you lift the finished dessert out). If the pan DOES have a removable bottom, butter the bottom and sides.
  2. Melt the butter and whisk in sugar and salt. Sift and mix in the flour.
  3. Press into a ¼” thick layer at the bottom of the prepared pan (you can make it curl slightly up the sides to help keep the filling/topping from sticking too much to the sides) and bake for about 25 minutes, until golden brown (this is a little crispier than normal shortbread cookies). Take out and set on a cooling rack. Prick the surface lightly all over with a fork - only halfway through the shortbread, not all the way through. This will help the filling to “stick”.
0 Comments

Cranberry Tart

2/1/2021

0 Comments

 
If you love tart desserts but are tired of always defaulting to lemon-based sweets, this cranberry tart is perfect. While the original recipe called for a nut-based crust, it seemed too finicky and the reviews seemed to indicate a bit of trouble getting it just right ... so I just subbed in the shortbread crust from the extremely lemony lemon bars which worked absolutely beautifully.
Picture
  • one portion of shortbread crust
  • 12 ounces (340 grams) cranberries
  • 1 cup (225 grams) sugar
  • Peel (orange part only) and juice of 1 orange (about 1/2 cup)
  • 1 tsp corn starch
  • 8 tbsp (113 grams) room temperature butter, cubed
  • 2 eggs + 2 egg yolks (or 3 whole eggs)
  1. Make the shortbread crust.​
  2. While the crust bakes and cools, make the cranberry curd: Put cranberries, sugar and orange juice and peel in a saucepan over medium heat. Simmer until cranberries have popped and softened, about 10 minutes (do not let the mixture cook down - you will want enough to cover the entire surface of the crust).
  3. For the most vibrant color, purée the cooked cranberry and orange mixture with an immersion blender or in a food processor or blender. Press the resultant puree through a fine-mesh sieve. (This should yield 1 - 1.5 cups of liquid if it wasn't cooked down too much.)
  4. Put eggs and egg yolks into a bowl and beat lightly. Slowly whisk a cup of warm cranberry liquid into the eggs to temper, then combine both and whisk together. Add corn starch and whisk well. Wipe out pot if necessary, return liquid to pot and cook over low heat until nearly bubbling and thickened, about 10 minutes. Whisk the butter into the warm liquid one cube at a time, making sure each cube combines completely before adding the next one.
  5. If using immediately, let cool to room temperature. If working ahead, cool to room temperature, cover with plastic wrap (press wrap against curd) and refrigerate. (Curd may be cooked up to 1 day ahead.)
  6. Pour cooled cranberry curd into the cooled prebaked tart shell and smooth top with a spatula. Bake at 350 degrees for 10 minutes to set curd. Cool on a rack. Store at room temperature for up to 2 days.
Notes: It's recommended that you do not pour the curd into the crust until the day of serving. Otherwise, the curd might make the crust soggy. For a 12" tart, you may double the filling amount.
0 Comments

Homemade Artisan Bread

12/27/2020

0 Comments

 
This bread was so popular I ended up making a new batch every single day for nearly a week! It delivered on everything that Sally's Baking Addiction promised. I'm copying the recipe here for my own easy reference when I bake at home, but I suggest checking out her page for all the tips and tricks if you're trying this out for the first time. The recipe really is as easy as it looks, but you may want to know how you can customize and adapt it to your taste - it's incredibly versatile and worth trying all the variations of!
Picture
  • 3 and 1/4 cups (460g) bread flour (see notes on substitutions), plus more for hands and pan
  • 2 teaspoons instant yeast
  • 2 teaspoons coarse salt (if only fine table salt available, reduce to 1.5 tsp)
  • 1 and 1/2 cups (360ml) cool water
  • optional: cornmeal for dusting pan
  1. In large un-greased mixing bowl, whisk flour, yeast, and salt together. Pour in cool water and gently mix together with a rubber spatula or wooden spoon. The dough will seem dry and shaggy, but keep working till all the flour is moistened and becomes sticky. If needed, use your hands. Shape into a ball in the bowl as best you can.
  2. Cover dough tightly with plastic wrap or aluminum foil and set on counter at room temperature. Allow to rise for 2-3 hours. The dough will just about double in size, stick to the sides of the bowl, and have a lot of air bubbles.
  3. You can continue with step 4 immediately, but for absolute best flavor and texture, let covered dough rest in refrigerator for at least 12 hours and up to 3 days. The dough will puff up, but may begin to deflate after 2 days. That’s fine and normal.
  4. Lightly dust a large nonstick baking sheet (with or without rims and make sure it’s nonstick) with flour and/or cornmeal. Turn cold dough out onto a floured work surface. Using a sharp knife or bench scraper, cut dough in half. Place dough halves on prepared baking sheet. Using floured hands, shape into 2 long loaves about 9×3 inches each (doesn’t have to be exact) about 3 inches apart. Loosely cover and allow to rest for 45 minutes.
  5. Preheat oven to 475°F (246°C).
  6. When ready to bake, using very sharp knife or bread lame (or even kitchen shears), score bread loaves with 3 slashes, about 1/2 inch deep. If shaped loaves flattened out during the 45 minutes rest, use floured hands to narrow them out along the sides again.
  7. Optional for a slightly crispier crust: After oven is preheated and bread is scored, place a shallow metal or cast iron baking pan or skillet (such as a metal 9×13 baking pan) on the bottom oven rack. Carefully and quickly pour 3-4 cups of boiling water into it. Place the scored dough/baking pan on a higher rack and quickly shut the oven, trapping the steam inside. The steam helps create a crispier crust.
  8. Place the pan with the shaped and scored dough in preheated oven on center rack. Bake for 20-25 minutes or until crust is golden brown. Gently tap loaves – if they sound hollow, the bread is done.
  9. Remove bread from oven and allow to cool for at least 5 minutes before slicing and serving. Store leftovers loosely covered at room temperature for up to 5 days or in refrigerator for up to 10 days.

Notes:
Make Ahead & Freezing Instructions: Dough can sit in refrigerator for up to 3 days. You can also bake the bread, allow it to cool, and freeze for up to 3 months. Thaw in refrigerator and allow to come to room temperature before serving. You can also freeze the dough. Complete the recipe through step 3. Wrap in plastic wrap and place in a freezer-friendly container. To bake, allow dough to thaw overnight in the refrigerator, or for 2-3 hours at room temperature. Continue with step 4 and the rest of the recipe instructions.
Flour: For absolute best flavor and chewy texture, I strongly recommend using bread flour. You can use a 1:1 substitution of all-purpose flour in a pinch with no other changes to the recipe. I recommend avoiding whole wheat flour in this dough. If necessary, use half bread flour and half whole wheat flour. The bread will taste a bit dense.
Round Loaf: If you want to shape the dough into a boule (round loaf) simply shape into a round ball instead of 2 loaves in step 4. Baking instructions are the same, but the loaf will take a few extra minutes in the oven. 
Using a pizza stone: If you want to bake your bread loaves on a pizza stone, place pizza stone in the preheating oven. Transfer shaped and scored loaves to hot pizza stone and bake as directed.
No Nonstick Pan: If you don’t have a nonstick baking sheet, line it with parchment paper instead. Coat with a dusting of flour and/or cornmeal before placing the dough on top. Parchment paper can burn, so it’s best to check the box to see how much heat yours can tolerate. Lower your oven heat if necessary and bake the bread for longer until golden brown and when gently tapped, sound hollow.
Flavor ideas: Before pouring in the water in step 1, add any of the following ingredients/combination of ingredients to the dry ingredients in the bowl: 4 cloves minced garlic + 3 Tablespoons chopped rosemary, 3 Tablespoons your favorite fresh herb (chopped), 1 cup your favorite shredded cheese, a diced jalapeño, 3/4 – 1 cup dried cranberries and/or chopped nuts, 2 teaspoons garlic powder, etc.
0 Comments

Marshmallow

12/23/2020

0 Comments

 
Homemade marshmallows! What more needs to be said?! Except that they seem to keep VERY well - longer than the recipe's recommended time. They are beautifully silky and soft and toast up fabulously.
Picture
  • 1/4 cup (30 g) cornstarch
  • 1/4 cup (40 g) confectioners' sugar
  • 3 packets (7_1/2 tsp) unflavored powdered gelatin
  • 1 cup (237 ml) cold water, divided
  • 1_1/2 cups (340 g) granulated sugar
  • 1 cup (237 ml) light corn syrup
  • 1/4 tsp fine salt
  • 2 tsp vanilla extract
  1. Whisk together cornstarch and confectioners' sugar.
  2. Lightly oil a 13"x9"x2" pan and dust with some of the cornstarch mixture, reserving the remainder.
  3. In the bowl of a stand mixer, sprinkle gelatin over 1/2 cup cold water and leave it to soften while you make the syrup.
  4. In a medium saucepan, whisk together remaining 1/2 cup of cold water, sugar, and corn syrup. Bring to a boil over medium-high heat without stirring and continue cooking undisturbed until syrup registers 240F (115C) on a candy thermometer, about 7-10 minutes.
  5. Fit stand mixer with whisk attachment and turn the machine on to low speed. Slowly add hot syrup to the gelatin mixture, pouring syrup in a thin stream. Beat mixture on medium-high until it is marshmallowy and cool to the touch and has nearly tripled in volume. Add the salt and vanilla, mixing on low speed until fully incorporated.
  6. Use a rubber spatula lightly coated with vegetabl oil or cooking spray to spread the marshmallow evenly in the prepared pan. Dust the top with cornstarch mixture and make sure it's completely coated and doesn't have any sticky spots. (Reserve remaining cornstarch mixture.) Let the marshmallow set overnight before cutting.
  7. Invert pan onto large cutting board. Lift up one corner of the inverted pan and use fingers to ease marshmallow out of pan onto cutting board. Use a large knife to trim marshmallow edges straight and cut into roughly 1" cubes. (An oiled pizza cutter can work too.)
  8. Sift remaining cornstarch mixture into now-empty baking pan and roll marshmallows through it, coating all sides and shaking off excess. Transfer to airtight container and keep at room temperature up to 1 week or freeze for 1 month.
0 Comments

Lemon Bars

11/27/2020

0 Comments

 
This started out as an experiment as I had read a Cook's Illustrated article on how to make an intensely lemon-y lemon bar without the fillers starting to get in the way. It's a tough balance between the liquid - the lemon juice - and the dry ingredients - the flour - because you can't really increase one without increasing the other. Adding more lemon means it becomes a runny mess unless you add more flour, but adding more flour simply cuts into the lemony taste.

Unfortunately, I've since lost the link to the Cook's Illustrated article, but it talked about a secret ingredient - cream of tartar. And from its detailed descriptions, I worked backwards from a standard lemon bar recipe and reconstructed the following for a crisp, crunchy shortbread topped with a truly lemony curd.
Picture
  • one portion of shortbread crust
  • ⅔ cup lemon juice (about 3-4 lemons)
  • 3 eggs + 3 egg yolks
  • 1 cup sugar
  • ¼ tsp salt
  • 2 tsp cream of tartar
  • 2 tsp zest
  • 2 tbsp flour
  • 4 tbsp butter, cut into four 1 tbsp chunks
  1. Make one portion of the shortbread crust.
  2. While the shortbread is cooling, combine all filling ingredients except the butter in a double boiler over medium heat. Continuously whisk while the double boiler is simmering, until the mixture has thickened to about a custard consistency, with faint trails left behind by the whisk.
  3. Remove the mixture from the heat and whisk in the butter one tbsp at a time, mixing until all the butter has been incorporated. Strain through a sieve into a clean bowl.
  4. Pour over the shortbread crust in about a ½” thick layer and return to the oven for about 10 minutes. The filling should have only the slightest wobble to it when you shake it.
  5. Let cool completely, remove from pan, then cut into rectangular pieces.
0 Comments
<<Previous
    Picture

    Sweet Enough

    Part of the reason I started baking was because I like my goodies to be less obviously sweet - I want to taste the flavor, not just the sugar. So most of these recipes will have the sugar dialed down.

    This site also acts as my mobile recipe box, so instructions are often pared down to a minimum - very few frills but for some hints and suggestions!

    RSS Feed

    Categories

    All
    Alcohol
    Almond
    Apple
    Avocado
    Baklava
    Banana
    Bars
    Biscotti
    Blackberry
    Blueberry
    Bread
    Buttercream
    Cake
    Candy
    Carrot
    Cheese
    Cherry
    Chicken
    Chickpea
    Chinese
    Chocolate
    Cider
    Cobbler
    Coconut
    Coconut Milk
    Cookie
    Corn
    Cranberry
    Cream
    Cream Cheese
    Creme Brulee
    Crumb
    Crust
    Cupcake
    Custard
    Dates
    Decoration
    Dip
    Dough
    Doughnut
    Dumpling
    Easy Peasy
    Egg
    Filling
    Flowers
    Frosting
    Fruit
    Garnish
    Gelee
    Granola
    Green Tea
    Honey
    Ice Cream
    Icing
    Jam
    Lamb
    Lemon
    Lime
    Lobster
    Lotus Seed
    Macaron
    Mango
    Marshmallow
    Meringue
    Mochi
    Muffin
    Nectarine
    Nutella
    Nuts
    Oat
    Oats
    Onion
    Orange
    Pancake
    Panna Cotta
    Peach
    Peanut Butter
    Pear
    Pecan
    Phyllo
    Pie
    Pistachio
    Plum
    Popsicle
    Pound Cake
    Pumpkin
    Quiche
    Raspberry
    Red Bean
    Rhubarb
    Rice
    Ricotta Cheese
    Rugelach
    Sauce
    Savory
    Scone
    Sesame
    Shortbread
    Soup
    Sponge
    Sponge Cake
    Strawberry
    Streusel
    Tahini
    Tart
    Tofu
    Topping
    Torte
    Vegetable
    Vinaigrette
    Walnut
    Watermelon
    Yogurt
    Zucchini

    Archives

    March 2021
    February 2021
    December 2020
    November 2020
    October 2020
    July 2020
    May 2020
    April 2020
    March 2020
    October 2019
    December 2018
    October 2018
    August 2018
    April 2017
    July 2016
    May 2016
    March 2016
    February 2016
    January 2016
    December 2015
    November 2015
    October 2015
    September 2015
    July 2015
    June 2015
    May 2015
    April 2015
    February 2015
    January 2015
    November 2014

© 2019 Jacqueline Teng | DragonWarden